Adjusting Levels & Curves
In basic photo editing, the options to adjust the ‘Levels’ or ‘Curves’ is available. These are both tools in Adobe photoshop, Gimp, Elements or similar. Both tools can ‘lighten’, ‘darken’ and control contrast. But they do it in different ways.
What’s the difference between ‘Levels’ & ‘Curves’?
In brief, the Levels adjusts contrast by setting the upper & lower levels of light and Curves will adjust the light levels by controlling contrast to different levels of light. But ‘Curves’ can also set the upper & lower levels of light.
Level Adjustment
When you adjust brightness levels in post-processing, you are adjusting the range of the brightness/ darkness levels in an image. This is determined through a histogram. The histogram displays the distribution of the different light value in an image. For example, a dark image would have a lot of value at the dark end of the spectrum (left hand side of the histogram), a bright image would have a lot of values at the bright end (right hand side).
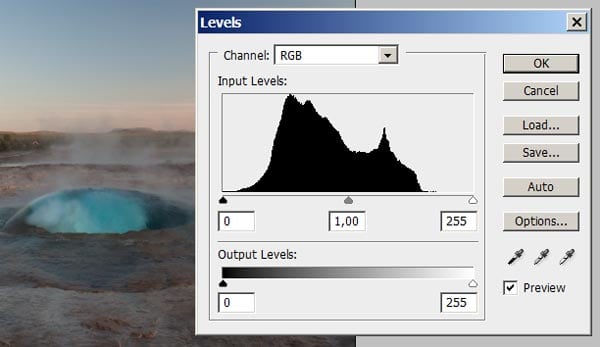
To start adjusting the levels, open an image in photoshop and go to image – adjust – levels. I am using a vertical photo of the Strokkur geyser. A Blue Bubble which forms just before the Geyser erupts.

Histogram Graph
The histogram is the graph shown below that looks like a mountain. The histogram range represents details that can be seen (and printed) in a photograph. Histogram graphs are essential tools because they give us real information about the light levels in a photo. Viewing an image on a computer monitor or laptop screen might not give you a true range.
The purpose of adjusting the levels is to have the whites in a high key image just clear of the right hand side of the histogram. The blacks in a low light image should be just clear of the left hand side.
It is a really good practice to check the histogram on your Digital Camera whenever you take an important photograph. The histogram is more accurate that the preview screen. If the histogram range is good, you will produce a better photo as a result.

Adjustment Sliders
The ‘Levels’ tool in Photoshop has three sliders. The right slider will adjust the bright values, the left slider will adjust the dark values and the middle slider will adjust the contrast.

For this example, I have put the right slider just at the edge of the brightest values (205), the left slider is at the edge of the darkest values (13) and the middle slider I have kept at 1,00 (middle). This means that the brightness values in my image are spread over the entire brightness/ darkness range.
The Result
The left side of the image has no levels adjustment. It is flat and lifeless as the brightness levels are spread too far. The right side of the image has optimum levels adjustment and is much punchier and has better colours. This is because the range of brightness values in the image are tighter.

The vertical photo of the blue bubble at Strokkur has been transformed with two sliders. The wider range of light has given the image a good contrast. But, that is just my opinion. Let me know what you think in the comments.
Curve Adjustment
Like layers, curve adjustments is a way of adjusting the brightness/ darkness levels in an image. The emphasis is put more on contrast and adjusting curves is a very smooth and sophisticated way of adjusting contrast.
When you open the Curves tool there is a straight, diagonal line frm bottom left to top right. The inclination (angle) of this line represents contrast, so if you put a ‘Curve’ in the line, some aspects of the photo will have a higher contrast and other parts will have a lower contrast.
For example if you pull down in the middle of the line to create a smile shaped curve, then the highlights will have a high contrast and the shadows will have low contrast. If you pushed the curve in the opposite direction, the shadows are high contrast and the highlights would be low contrast.
Because the curve can be ‘s’ shaped, this allows more control than “levels adjustment” because you can affect the shadows and highlights differently. The ‘S’ shaped curve will increase contrast in the mid-tones. The ‘S’ shaped curve also reduces contrast in the shadows and highlights.
Open an image in Adobe Photoshop and go to Image – Adjustments – Curves

This action will open the curves dialogue box.

- Click on the line at the intersection as shown
- Adjust the output to be 10 points lower than the input level.
- The output level should stay around the 65 mark.
Adjusting the highlights and shadows
What happens to the straight line in the curves dialogue box? What happens to your image?
The line starts to curve and your image should get darker. We are adjusting the shadows in your image.

Now click on the line in the upper third of the dialogue box. The input value is around 191, for this example, adjust the output to be 10 points higher that the input value (201).
We have created a very gentle ‘S’ shaped curve and the contrast across the mid-tones has been increased and the contrast in the highlights and shadows reduced very slightly and very smoothly.

The left side of the image has no adjustment and the right has very gentle curve adjustment. What do you notice? which side do you prefer and why?
In landscape & Nature photography, the ‘S’ curve is the preferred shape of curve because it flattens contrast in the brighter highlights and darker shadows while increasing the contrast over the mid-tones. The Mid-Tones are where the richest colours are.
Conclusion
As you can see the results of both ‘Layers’ & ‘Curve’ adjustments are quite similar. They have controlled the brighter highlights and danker shadows in their own way. The same result was achieved in fewer steps with a ‘Levels’ adjustment, bu the curve adjustment has more control over the highlights and shadows.