In landscape photography, filters filter light. Photography filters come in different shapes and sizes. Different strengths and colours can add to the variety of nature photography filters. This article is about my experiences with circular filters. The pros and cons of both circular and square photo filters is discussed.
- Solid Neutral Density
- Variable Neutral Density
- Graduated Neutral Density
- Circular Polarizer Filters
Neutral Density
Most of the photos on Iceland Aurora were taken with the help of a Neutral Density filter. Ever since I stumbled across the Magic Cloth Technique, I have stuck with the same filter. My ND filter is a 77mm circular filter. It screws perfectly onto the end of my Canon EF 24mm prime lens. It is flush with the front of the lens and actually completes the water-proofing for the lens. It also physically protects the front lens element.
The point of the ND filter is to slow down the shutter speed to create movement effects such as Silky waterfalls. Solid neutral density filters can be square or circular.
Private Northern Lights Tours
ND filter Pros
The solid ND filter is the key to creative nature photography. If you are a beginner, I would recommend buying a cheap ND filter just to play around with. They are easy to store and can be stacked.
My preference is for a circular ND. The circular ND filter offers great protection for your lens and can be kept in place with your lens cap on and stored in your camera bag.
Not Neutral
Neutral Density filters are also known as dark filters or grey filters. In a perfect world, the ND filter would be ‘neutral’ which means that it won’t affect the colour of the light. No neutral density filters are neutral. The more expensive ND filters are more ‘neutral’ than the cheaper ones.
The ND filter I use is made by B&W and has a slight rose tint. The photo ends up sightly warmer than reality. I actually like the result, so my tip for choosing an ND filter is to find a brand that has a colour cast in the direction YOU want.


2024 Calendars on Amazon
Order online!
Iceland Aurora

Volcanic Iceland

Iceland Landscapes

Amazon International


Six Stop Filter
To use ND filters in all light conditions, you need at least two different strengths (or a variable -ND – see below). However, if you only shoot long exposures close to sunset or sunrise times, then you can get away with 4–6 stops. I only used a 6-stop after experimenting with different strengths.
My 5D3 camera is still high quality at ISO 400, and my 24mm prime lens is good between f/6.3 and f/16, so this gave me a good range of low-light conditions where I could successfully use a 6-stop ND. I take my ND filter off when the sun is down and screw it in when the sun is in the sky.

Browse B&W ND filters on BHPhotoVideo
ND Filter Cons
There are three different number systems to communicate the strength of the filter. Several times I have brought a Neutral Density filter because the packaging and the numbers convinced me that it was a strong ND. I bought an ND8, thinking it was an 8-stop filter when in fact it is a 3-stop. My B&W filter is number 106; this tells me that it is 6-stop strong. See the table below to check that you are buying the right strength.
If you are using a 10-stop ND, you may have to remove it every time you want to re-compose or change focus. Taking them off and putting them on again can be a chore.
ND Strength Guide
ND filters are measured in f-stops. One stop will double the exposure time. Three stops will double it, then double it, then double it again.
| No Filter | ND2- 1 Stop (0.3) | ND8- 3 Stop (0.9) | ND64- 6 Stop (1.8) | ND1000- 10 Stop (3.0) | |
| Exposure Time | 1 sec | 2 sec | 8 sec | 64 sec | 1000 sec |
Variable ND
The variable ND is a great concept. It is made with two layers of polarised glass. As you rotate one layer, the scene becomes darker. This means that you can really fine-tune your exposure without compromising ISO or aperture.
But the variable ND is not so good in wet conditions like waterfall spray. If moisture gets between the two pieces of filter glass, then your variable ND is out of action for the rest of the day. It will dry out overnight, though.

Circular Polariser
A circular polariser filter (CPL) uses technology beyond my tiny mind. My understanding is that it reduces reflected light from non-metal surfaces. It you are taking a photo through a window and it is difficult to tell what is through the window and what is reflected on the glass, the polariser is very useful
In nature photography, a polariser can cut out some of the reflection on a placid lake. This can reduce glare and help you see objects below the surface. In some cases the reduction of glare can help your exposure because you can expose the whole scene more without losing highlights.
The polariser filter can make the sky more blue because it reduces the haze. This effect is greatest at around 90 degrees from the sun. At high altitudes a polariser filter can turn the sky black. The polariser can enhance a rainbow and it can kill a rainbow. It can also give you a slightly longer exposure to achieve the silky water fall effect.
Turn it Off
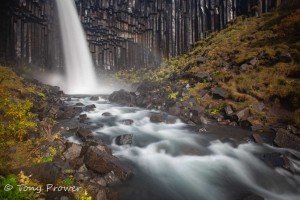
Circular polariser filters are almost always circular. This is because they can be turned on and off by rotating them. The rotation is about 90 degrees. Some polariser filters have a mark to indicate if they are on or off. The following photo was taken with a circular polariser, but it was turned off.

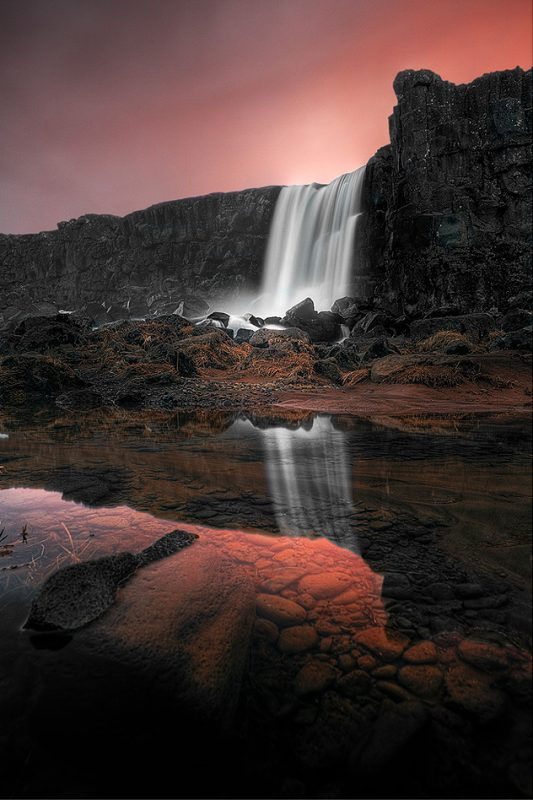
Turn it On
The circular polariser was turned on for the next photo. This allowed me about an extra stop of exposure because the haze on the surface of the water and in the sky have been reduced dramatically.

Cons.
A circular Polariser shouldn’t be used with anything wider than 24mm because there will be uneven polarisation across the scene. A few of my polariser filters ended up in rivers because I was turning them the wrong way. I thought I was turning the polarisation off, but I was actually unscrewing the circular filter. The remedy for this is to always turn them in the direction that tightens them. But don’t tighten them too much.
Because the filter has a turning component, it can get stuck on your lenses very easily. Especially if you stack it with another filter. This is nothing that a good filter wrench won’t fix. In my experience, the worst thing about polariser filters is maintenance. The polarising glass is very temperamental and hates finger prints or grease. These are filters that need to be kept in immaculate condition with their own dedicated cloth.

How to Prevent Vignetting?
Vignetting refers to dark corners in a photograph. Photos naturally have a feint and gradual vignette, but using a circular filter can give you hard black corners. The Polarised photographs above have vignettes, but I merely cropped the image to remove them. But vignetting can be eliminated completely. The ultimate solution for vignetting is to use a circular filter that is a size too big for your lens and then use a step-up ring. Filters are more expensive in the larger sizes, but you could use the same filter for all your lenses with a set of step-up rings. If you have a huge lens, like the Nikor 14-24mm, then you need really big filters and adapters.
Vignetting is worse if you stack filters, so avoid stacking filters. I you are using a wide-angle zoom lens, the vignette might appear at your widest angles, so try to compose with narrower focal lengths. (A circular Polariser shouldn’t be used with anything wider than 24mm because there will be uneven polarisation across the scene.)
How do I loosen a stuck filter?
Circular filters can get stuck fast on your lens. Obviously, this is not ideal for a trip that you have invested heavily in. I have never had a problem with my solid 6-stop ND filter. The metal rim is thick enough to get a grip on, and I merely turn it against my lens. Problems occur when photographers stack filters or use ultra-thin filters. Ultra-thin filters are very useful if you want to reduce Vignette, but the rims don’t give you much to grip onto. A thin Circular Polariser is even worse because the outer glass rotates freely anyway.
- Gentle Touch
Using a gentle touch to loosen a stuck filter is strongly recommended because I have seen a 100% success rate with many filters.
The effectiveness of this trick is that if you use a very light finger grip and stroke the filter rim with gentle movements, the filter will eventually unscrew. Photographers will usually do the opposite and apply a tight grip. A tight grip will only worsen the friction on the filter thread. If the Gentle Touch fails, then use a filter wrench.
- Filter Wrench
A filter wrench can save your day if your filters are stuck on the lens. Step-up rings are a great solution if your lenses are different sizes. Hint: buy the filter for your biggest lens and use step-up rings for the smaller lenses.
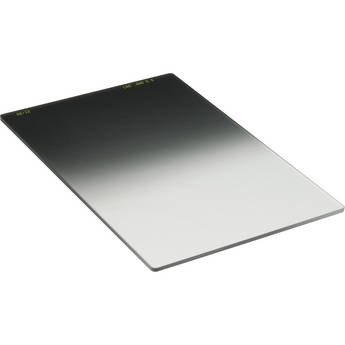
Graduated Filters
A graduated neutral density filter is dark at the top and light at the bottom. You can get circular Grad filters, but you need to be able to adjust them vertically to suit your composition. So they are normally large rectangles of glass (although they are called ‘Square’) and come in a set of different strengths.
None of my photos on Iceland Aurora were taken with a graduated filter because the Magic Cloth Technique had the same effect. Also, I couldn’t afford a set of Lee Filters.
Graduated filters come in different strengths measured in stops. So a 2-stop grad will be like a 2-stop ND at the top and clear at the bottom. There is a soft grad and a hard grad. The hard grad is suitable for sunrise over the horizon type photos. The soft grad is sometimes better when the horizon is broken or not visible. Some filter brands make a Reverse Grad which gets slightly lighter a the very top of the glass.
Pros
A full set of Graduated Filters will give you total exposure control over your landscape photography. You will produce better-quality photos with a set of grads and nice light.
Cons.
The cost of a full set and adapters and holders is prohibitive. Some lenses, like the Nikor 14-24mm need even more expensive adapter kits. Square filters are more fragile than circular filters. Although they don’t have to be made of glass,. Hi-Tech produces plastic Grad Filters.
Browse Graduated Filters on BHPhotoVideo
Filter Maintenance
Keeping your filters working properly mostly involves keeping them clean and scratch-free. I find that the Circluar filters are easier to keep scratch-free. This is mostly because they are encased within a metal ring, which offers protection around the edges of the glass. The metal rim is also a place where you can handle the filter without getting finger prints on the surface.
How do you clean a Solid ND filter?
I have only ever used a blower and a dry cloth. My cloths are just the basic cloths that you buy in the supermarket for glasses. These micro-fibre cloths are designed for your reading glasses, but they work perfectly for cleaning your lens glass and filter. It is important to start with the blower to remove any surface dirt before rubbing the glass with a cloth. I could never get on with compressed air, but if you are a passenger in a car, you can hold your filter out the can window for a good blower. More adventurous photographers could get their filters out on the back of a motorcycle.
- Use a blower (or compressed air) before using the cloth
- Rub the surface of the filter with a clean, dry micro-fiber cloth
- Clean the lens and inside of the ND filter before screwing the filter on the lens.
The rubbing action should be circular, starting from the centre of the filter glass. Add a little breath for stubborn dirt.
How do you clean a Variable ND?
Variable ND filters require a little more maintenance. Because there is a chance of moisture getting trapped between the two layers of polarised glass, they sometimes need time to be able to dry. The surface of a Variable ND is more likely to have a thick coating, just like a Polariser (CPL) filter.
How do you clean a Polariser (CPL) filter?
Depending on your filter brand, cleaning your CPL can seem like an impossible task. The brand I had trouble with was Hoya. Hoya makes a great Circular Polariser, but the coating is so thick that it traps grease, which cannot be removed with a normal cleaning technique. The coating is important because it protects the surface of the filter against scratches and helps to reduce flare. Lens flare is caused by having several layers of glass. A CPL (and Variable ND) adds an extra two layers of glass, so the coating is more important. If your circular polariser or variable ND have become impossible to clean, then you might need a 99% ethyl alcohol mixed with distilled water. This will dissolve any grease.