This article discusses tips for shooting against the rain or waterfall spray. Both are common issues when you are shooting against the wind near waterfalls or angry beaches in Iceland. My general advice to start with is to find angles with your back to the wind. Start with the driest and work towards the wettest. If there are no decent shots shooting with the wind, check the forecast to see if the wind might change direction.
1) Do nothing I
The droplets on your lens become part of the image and tell the story of what the conditions were truly like. This is not a popular option and I admit it works better with movies than still images. This technique is not recommended unless you are sure that your lens is water sealed. Most expensive lenses are only water-proof with a circular filter. I would avoid using a variable ND in wet conditions because they become useless for the rest of the day if they get damp between the glass.
2) Do nothing II
Just sit back and let the water accumulate on your lens. For this option, you need a waterproof lens and I would suggest a filter such as ND or UV to take the impact of the wetness. I think this works best in extremely wet conditions. But, please see above about ensuring your lens is water tight.
3) Magic Cloth Technique
The Magic Cloth Technique can be used to wipe the filter while you are shooting. Bear in mind that the wiping will generate small vibrations even with the sturdiest tripod. Also the Magic Cloth never really clears the rain from the filter, it just moves it around, but the result is quite satisfactory.
4) Wipe and hope
This option means that you or your assistant wipes the lens dry before you take the shot.
My personal favourite is option 4) Wipe and hope. It requires a bit of preparation. You will need a lens cloth and some paper towel. If you use a filter, it is best to start with the filter on, you may want to take it off after a couple of shots to get a few more shots. There will be a point when shooting is futile, the key is maximising the shots you do take, but starting with a clear filter will give you more opportunities because you can take if off and start again when it becomes un-manageable.
Procedure
Prepare your camera and lens for waterproofing, i.e. waterproof bags. Prepare some paper towels (not tissues) and a good optical cloth. Keep the lens cloth somewhere dry, like your pocket, you need to protect this more than the camera. Set up your camera in the wet spot and try to adjust your settings and rough composition with the lens cap still on. When you take the lens cap off, you should be ready to fine-tune your composition and focus. Use the 2 second timer. Soak most of the water from your filter with the paper towel… Press the shutter and in the 2 second delay wipe the filter dry with the lens cloth. Replace the lens cap as soon as the shutter closes.
As you can appreciate this requires some coordination and is quite fiddly, also the 2 second timing might take some practice. This is where an assistant comes in handy.
Gullfoss Magic cloth
This photo of Gullfoss waterfall was made with a combination of the Magic Cloth and the Wipe and hope techniques.
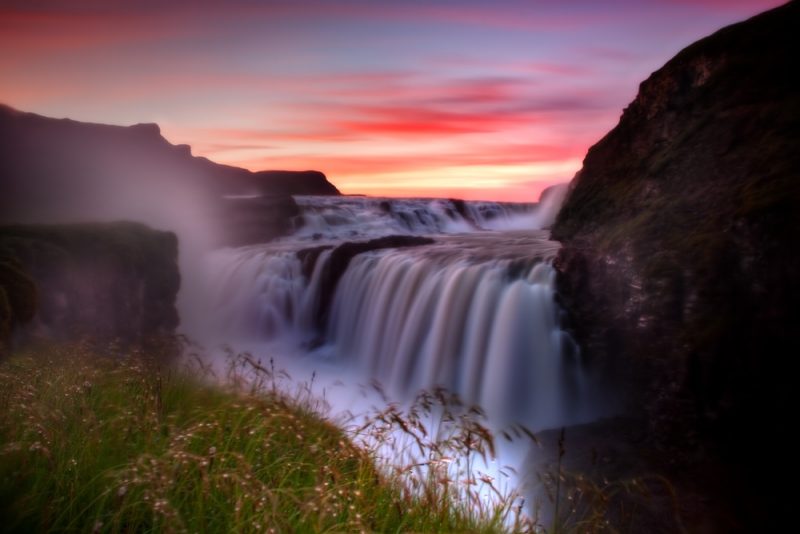
The spray that you can see to the left was hitting the face of my lens constantly. The detail has really suffered and only small areas of detail survived the spray. The wind moved most of the grass during the long exposures. Despite the glaring imperfections, I feel that the image still works on some dreamy level. The image is also droplet free.
5) Perspex Filter
This technique would involve a piece or perspex or glass that you place in-front of your lens while you are not shooting. It could be a clear plastic bag at the cheapest end or something resembling a circular filter that you can quickly fix and remove. You would be able to work and even practice shots with this protector in place and then remove it just before your take the real photograph. The key is to be able to remove and replace this clear protector very quickly. This idea could work really well with some development.