Novice in the Dark
Why am I writing about the basics of night photography for beginners? Never the twain shall meet, surely? Night photography requires a whole set of skills that are way beyond the typical beginner, and the beginner should be in bed before 9 p.m., right? Well, I am going to argue that not only can night photography and beginner photographers go together, but they should go together.
Night photography is a speciality. Many online galleries don’t even have a “Night Photography” category, so you end up putting your dark images into “Landscapes” or “Nature.”. But actually, the “Night photography” category has several categories of it’s own: star-trails, Milky Way, Northern Lights, Big Cities, moonies, fireworks, etc.
Long exposures at night
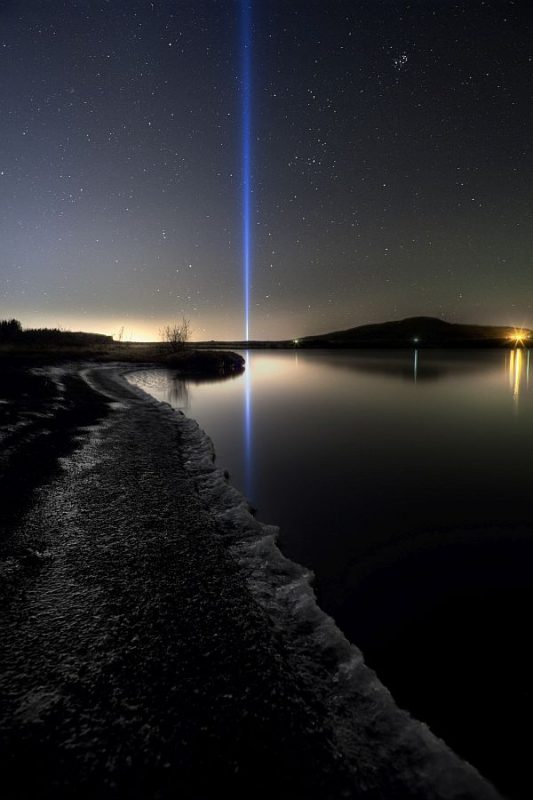
Night photography using the technique of long exposure can uncover hidden details of landscapes in a way that would otherwise be invisible to the eye. Through this technique, features such as stars and the Milky Way can be captured, bringing out colours and moods that are not available during the day.
Long-exposure night photography also allows for the capture of light trails from passing vehicles as well as highlighting the movement of water, such as clouds, waves, and rivers. This technique can create surreal images by allowing the photographer to blur movement and give a painterly quality to the images.
Night Equipment
For equipment, you will need a camera that can take long exposures. This means that the shutter has been open for a long time. Many cameras allow you to go to 30-second exposures in manual mode. This will get you started and is fine for some types of night photography (i.e., Northern Lights and City), but for more long-exposure power, you will need a way of keeping your camera shutter open for longer periods of time.
Traditionally, photographers have used a cable with an air bulb that screws into the shutter, but modern digital cameras have many ways of achieving bulb mode (bulb mode means that you are in total control of the shutter opening and closing). My Canon has an infrared remote, but you can get cable versions or even Android apps that will give you extra exposure power.
2024 Calendars on Amazon
Order online!
Iceland Aurora
Volcanic Iceland
Iceland Landscapes
Amazon International


Steady Now
With most long-exposure photography, it is critical to keep the camera still throughout the exposure. The slightest movement can ruin the shot. With tripods, you generally get what you pay for. For night photography, you will want a tripod that keeps your camera steady at about chest height. Heavy is good if you don’t have to walk far with it.
Camera Skills
You need to be able to use manual or bulb mode. Some cameras actually have a ‘Bulb’ setting, and some cameras have bulb as the last option on the shutter speed dial. You need to be able to change the ISO range as well as any ‘high-ISO-noise-reduction‘ settings.
In countries that are warmer than Iceland, you should consider using ‘Long-exposure-noise-reduction’. This will repeat all your exposures without any light and then subtract noise generated by sensor heat from your live exposure. This can be time-consuming, so it should be used sparingly.
- Read more about in-camera noise reduction
Lens Skills
Know how to switch your lens to manual focus (no auto-focus). On some cameras, the switch is a physical switch on the lens. Other cameras might have manual focus’ in the menu or on the camera body. Then it helps to understand the value of a ‘f-stop’. (see below).
Focus
Sharp stars at night need a focal point close to infinity. Especially when you are using larger apertures. If you are happy taking very long exposures, you can choose a mid-range aperture so that the focal point can be closer. This also works with wider-angle lenses.
Finding infinity in the dark can be a problem. Cheaper lenses will give you no information about the focal point. You might have to get an ‘infinity focus‘ in the daylight and then tape your lens’s focus ring so it can’t move. It is better to know this before it gets dark!
If the moon is in the sky, you can get auto-focus (which will be infinity on any lens). If you can get auto focus from a street lamp, a building, or the rear lights of a car 50 meters away, this will work for wide-angle lenses. Remember to switch back to manual focus after.
If your photo isn’t about the night sky, you can get a closer focal point by simply placing a phone or torch somewhere in the scene, just to get auto-focus.
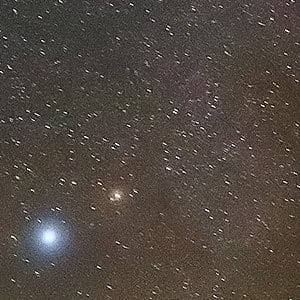
Star Trails
Know the 600 rule for avoiding star trails. If you divide 600 by your focal length, the answer will be the number of seconds before stars noticeably trail. Example one: a 24 mm lens: 600/24 = 25 seconds. Example two: 14 mm lens – 600/14 = 43 seconds. Tip: Using 500 is easier to do in your head.
Camera Settings
We have talked about bulb mode and long exposures, but how long do the exposures have to be? When you are in bulb mode, your camera stops helping you. Bulb mode is like extreme manual mode. You are on your own to figure out how long you should expose the scene. This is an important calculation because if you decide in 8 minutes and you are wrong, you have wasted 8 minutes.
Apart from the shutter speed, what other things can you adjust?
Aperture and ISO can also be adjusted, so let’s step back into the classroom to see how adjusting these can help you get the right exposure length by understanding f-stops.
Recommended Gear
This is the camera equipment that I use for night photography.
Canon 5D – full frame |
Canon EF 24mm f/1.4 l |
Gitzo Carbon Fiber Tripod |
Infra-red Remote Controller |
Exposure Stops
Good exposure is critical if you want to avoid noise. An exposure stop is an increment of light coming into the camera. When you adjust your three main exposure settings, the differences are measured in exposure stops. To increase exposure by 1 stop means to double the amount of light coming into the camera. To decrease an exposure by 1 stop means to half the amount of light coming into the camera.
- Shutter speed: double the exposure length = +1 stop.
- Aperture: double the aperture = +1 stop.
- ISO – double the value = +1 stop
Just to mess with your heads, halving the aperture will double the f/value. i.e. half of f/2.8 is f/5.6
Test your exposure stops.
- 1) You are using f/11 and you want to adjust your aperture to give you +1 stop. What would you change the aperture to?
- 2) If your ISO is 200 and you want to adjust it to reduce your exposure by 1 stop, what would you change iso to?
- 3) In bulb mode, you took an 8-minute exposure, but you need to increase the exposure by 1 stop. How long do you have the shutter open next time?
- 4) If all your camera settings are correct but the camera won’t shoot, what should you check first?
1) f/5.6
2) iso 100
3) 16 minutes
4) Manual Focus
Read more about Night Photography Exposure here…
Environment
You need to know about the place you are shooting and if there are any dangers involved. In cold environments, ice can form at night, leading to slippery roads and paths.
Out in the field
If you got correct or close answers to the ‘Exposure Stop’ test, then you could end up with some decent night photography exposures. Now that you are set up with your camera pointing into the dark, let’s use your knowledge of stops to get a perfect exposure with professional settings. You shouldn’t expect perfection in night photography. These are not the sort of images you would normally sharpen, for example. Viewers will expect a dark image, and they won’t expect fine art details in the shadows. If stars are present, they should be sharp, or they will be blobs (round white dots). A sharp star looks like a short pen stroke.
Set quality goals
With a mid-range camera, you should be aiming around the middle for aperture and ISO. If ISO 1600 is good on your camera, then aim for ISO 800. For your lens aperture, aim for f/11 (unless you have a close-up composition), because this will give you good DOF and good sharpness. With good exposure, these settings should be fine for print quality. Once you have your quality goals, you need to figure out the final part of the exposure triangle, = shutter speed. Shutter speed could be anything from 10 seconds (snow landscape with full moon) to 30 minutes (dark landscape – new moon) with ISO 800 and f/8.
If your first night photography session is in a dark landscape with no moon, trial and error could take some hours. Even if you are a die-hard photo enthusiast, you won’t want to waste hours on a cold night. Using longer exposures instead of high ISO will reduce the chances of high ISO noise, but it is important to note that poor exposures are more responsible for noise in night photography.
Put on your Maths Head – Time to use your knowledge of Exposure Stops.
What we do is use the starting settings to stop up. We increase the aperture to f/2.8 (+2 stops), then increase the ISO to 3200 (+2 stops). This gives us an increase of 4 stops. Now you can trial and error exposures for around 1 minute until you get the right exposure,e and then multiply the number of seconds by 4 and use your quality goal settings. So let’s say the good exposure was 2 minutes at f/2.8 and ISO 3200. At f/11 and ISO 800 the exposure should be 8 minutes.
Common Mistake
The Number one beginner mistake at this point is to judge your exposure by looking at the image preview. This is fantastic for judging your composition, but can be disastrous for judging your exposure. The reason is that your eyes have adjusted to the darkness and are very sensitive to light. An under exposed photo will look great in the dark at night, but when you get it home it will be too dark to be useful. Under-exposure is the gateway to noise in Night photography.
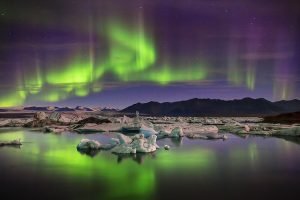
Histogram
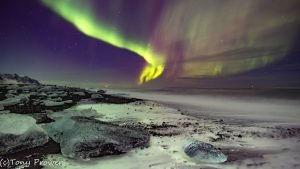
Always use the histogram to judge your exposure at night until you become used to what it should look like on the preview. A good night photography histogram will have the mountain crossing the half-way point, like the unprocessed Northern Lights photograph open in Lightroom below. The histogram is top left in Adobe Lightroom and shows you data (usually in the form of a mountain), with dark on the left and bright on the right. As long as this mountain is within the boundaries of the histogram, you have data to make a photograph. What you don’t want is half a mountain at one end.

Have a go
I am excited that you might have learned something from this. The next step is to get out there and get shooting. Experiment and have fun. Someone who sees themselves as a beginner sees themselves as someone ready to learn. Hopefully, I have shown that with a bit of equipment upgrade and an understanding of exposure stops, a beginner can experiment with night photography. Apart from falling down a dark hole or being attacked by a night panther, what’s the worst that could happen?
The rewards
Now I am going to tell you why a beginner should try night photography. When you are out in the dark with your camera making exposure adjustments and changing modes, you really learn your camera. It is “in at the deep end,” but it really gets you well acquainted with your camera controls. My driving instructor taught me beginner car control at night so I wouldn’t look at my feet. Imagine being able to look at a scene while your hands are correctly changing the settings on your camera because you know it all by feel.
Exposure and compositions
Shooting at night teaches you a lot about composing. Especially in a long exposure night landscape where a poor composition wastes many minutes. When you start a 10-minute exposure, you better be sure you have a good composition. Taking pictures at night teaches you about exposure. Well, you just learned what an exposure stop is!
Beginner Tips
Setting your camera at chest height will allow you to control the camera comfortably. If your hands are working above your heart, they will get colder quicker. Having your camera at chest height will allow you to see settings on top of your camera and lens easily.
Check out your nighttime locations during the day. This not only makes it slightly safer, but you can find compositions easier and even leave your camera set-up ready for the night.
Turn off auto-focus. This will work if there are city lights, but even then, you should switch to manual focus. It can be difficult to focus in the dark, but your camera will never manage it and will refuse to shoot. Some lenses have an infinity mark, so you can judge the focus on the outside of the lens. Others have soft-focus rings that are difficult to use at night. If you do have a light source, such as a car light or building, you might be able to use auto focus and then switch to manual.
Ask questions.
Conclusion
Night photography is a great way to take some unique and creative photos. It can also help you to learn additional camera skills that can benefit you in other areas of photography. Although it can be challenging at first, night photography can be rewarding and fun. By understanding the basics, such as the importance of shutter speed and ISO, you can begin to experiment and discover what techniques work best for you. With practice and patience, you can quickly become a pro in night photography and create stunning images in the night sky.
Other resources
Night Sky Pix is a site focused on teaching night sky photography (astrophotography) in an easy to understand way.
We’re all about viewing the sky (stars, moon, galaxies) and photographing detailed images of objects in the night sky with specific telescope and camera equipment and settings.
Below is one of our guides we have written to show how easy photographing the night sky can be.